 MENU
MENU


NOTE!
Click on MENU to Browse between Subjects...17CS553 - ADVANCED JAVA AND J2EE
Answer Script for Module 4
Solved Previous Year Question Paper
CBCS SCHEME
ADVANCED JAVA AND J2EE
[As per Choice Based Credit System (CBCS) scheme]
(Effective from the academic year 2019 -2020)
SEMESTER - V
Subject Code 17CS553
IA Marks 40
Number of Lecture Hours/Week 03
Exam Marks 60
These Questions are being framed for helping the students in the "FINAL Exams" Only
(Remember for Internals the Question Paper is set by your respective teachers).
Questions may be repeated, just to show students how VTU can frame Questions.
- ADMIN
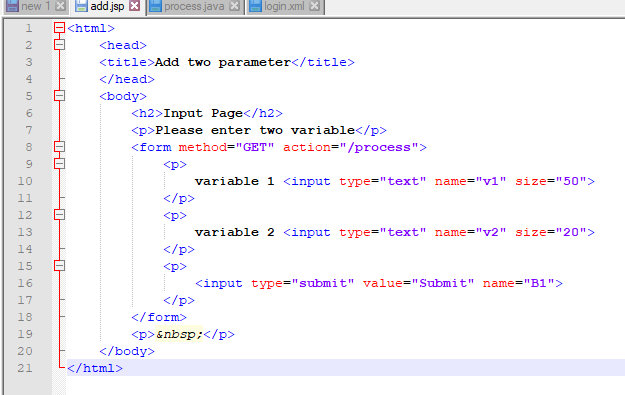
The role of Tomcat server:
To create servlets, you will need access to a servlet development
environment. The one used by this chapter is Tomcat. Tomcat is an
open-source product maintained by the Jakarta Project of the Apache Software
Foundation. It contains the class libraries, documentation, and runtime
support that you will need to create and test servlets.
The examples in this chapter assume a Windows environment. The default
location for Tomcat 5.5.17 is
C:\Program Files\Apache Software Foundation\Tomcat 5.5\
This is the location assumed by the examples in this book. If you load
Tomcat in a different location, you will need to make appropriate changes to
the examples. You may need to set the environmental variable JAVA_HOME to
the top-level directory in which the Java Development Kit is installed.
To start Tomcat, select Configure Tomcat in the Start | Programs menu, and
then press Start in the Tomcat Properties dialog.
When you are done testing servlets, you can stop Tomcat by pressing Stop in
the Tomcat Properties dialog.
The directory
C:\Program Files\Apache Software Foundation\Tomcat 5.5\common\lib\
contains
servlet-api.jar
. This JAR file contains the classes and interfaces that are needed to build
servlets. To make this file accessible, update your
CLASSPATH
environment variable so that it includes
C:\Program Files\Apache Software Foundation\Tomcat
5.5\common\lib\servlet-api.jar
Alternatively, you can specify this file when you compile the servlets. For
example, the following command compiles the first servlet example:
javac HelloServlet.java -classpath
"C:\Program Files\Apache Software Foundation\Tomcat
5.5\common\lib\servlet-api.jar"
Once you have compiled a servlet, you must enable Tomcat to find it. This
means putting it into a directory under Tomcat’s webapps directory and
entering its name into a web.xml file. To keep things simple, the examples
in this chapter use the directory and web.xml file that Tomcat supplies for
its own example servlets. Here is the procedure that you will follow.
First, copy the servlet’s class file into the following directory:
C:\Program Files\Apache Software Foundation\Tomcat
5.5\webapps\servlets-examples\WEB-INF\classes
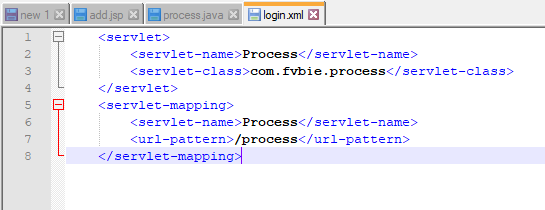
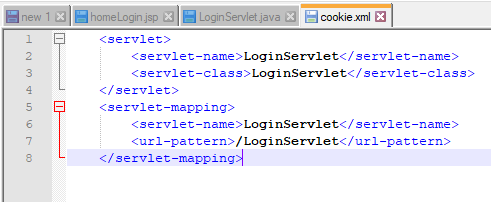
Next, add the servlet’s name and mapping to the web.xml file in the
following directory:
C:\Program Files\Apache Software Foundation\Tomcat
5.5\webapps\servlets-examples\WEB-INF
For instance, assuming the first example, called
HelloServlet
, you will add the following lines in the section that defines the servlets:
<servlet>
<servlet-name>HelloServlet</servlet-name>
<servlet-class>HelloServlet</servlet-class>
</servlet>
Next, you will add the following lines to the section that defines the
servlet mappings.
<servlet-mapping>
<servlet-name>HelloServlet</servlet-name>
<url-pattern>/servlet/HelloServlet</url-pattern>
</servlet-mapping>
There are five types of JSP Tags & are as follows:
Comment tag:
A comment tag opens with <%-- and closes with --%>, and is followed
by a comment that usually describes the functionality of statements that
follow the comment tag.
Declaration statement tags:
A declaration statement tag opens with <%! and is followed by a Java
declaration statement(s) that define variables, objects, and methods that
are available to other components of the JSP Program.
Directive Tag:
A directive tag opens with <%@ and commands the JSP virtual engine to
perform a specific task, such as importing a Java package required by
objects and methods used in a declaration statement. The directive tag
closes with %>. There are three commonly used directives. These are
import, include, and taglib
. The
import tag
is used to import Java Program into the JSP Programs. The
include tag
inserts a specified file into the JSP program replacing the include tag.
The taglib tag specifies a file that contains a tag library.
<%@ page import=" import java.sql.* "; %>
<%@ include file="keogh\books.html" %>
<%@ taglib uri="myTags.tld" %>
Expression Tag:
An Expression tag opens with <%= and is used for an expression statement
whose result replaces the expression tag when the JSP virtual engine
resolves JSP tags. An expression tags closes with %>.
Scriptlet tags:
A scriptlet tags opens with <% and contains commonly used Java control
statements and loops. A scriptlet tag closes with %>.
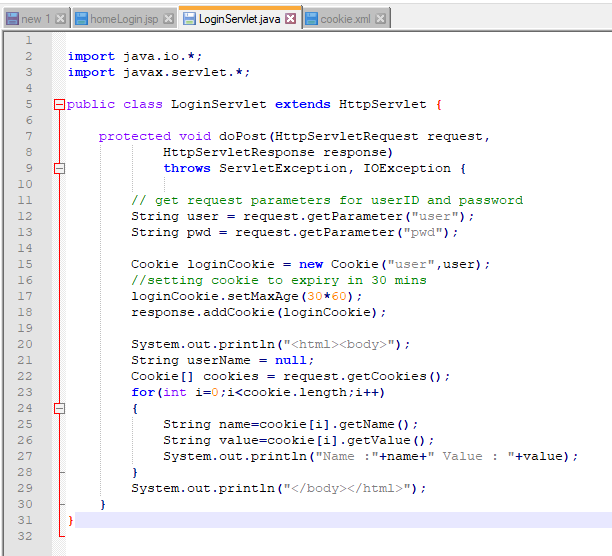
The Cookie class encapsulates a cookie. A cookie is stored on a client and
contains state information. Cookies are valuable for tracking user
activities. For example, assume that a user visits an online store. A cookie
can save the user’s name, address, and other information. The user does not
need to enter this data each time he or she visits the store.

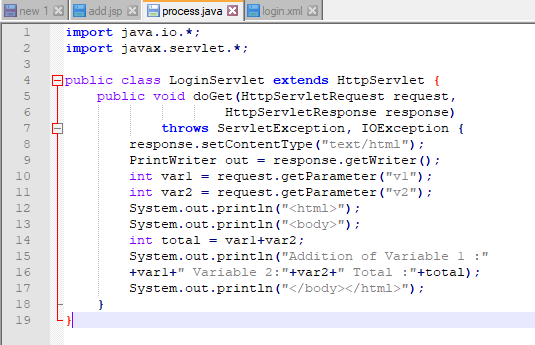
Three methods are central to the life cycle of a servlet. These are
init( )
,
service( )
, and
destroy( )
.
They are implemented by every servlet and are invoked at specific times by
the server. Let us consider a typical user scenario to understand when these
methods are called. First, assume that a user enters a Uniform Resource
Locator (URL) to a web browser. The browser then generates an HTTP request
for this URL. This request is then sent to the appropriate server.
Second, this HTTP request is received by the web server. The server maps
this request to a particular servlet. The servlet is dynamically retrieved
and loaded into the address space of the server.
Third, the server invokes the
init( )
method of the servlet. This method is invoked only when the servlet is first
loaded into memory. It is possible to pass initialization parameters to the
servlet so it may configure itself.
Fourth, the server invokes the
service( )
method of the servlet. This method is called to process the HTTP request.
You will see that it is possible for the servlet to read data that has been
provided in the HTTP request. It may also formulate an HTTP response for the
client. The servlet remains in the server’s address space and is available
to process any other HTTP requests received from clients. The
service()
method is called for each HTTP request.
Below Page NAVIGATION Links are Provided...
All the Questions on Question Bank Is SOLVED
Follow our Instagram Page:
FutureVisionBIE
https://www.instagram.com/futurevisionbie/
Message: I'm Unable to Reply to all your Emails
so, You can DM me on the Instagram Page & any other Queries.